Installing MySQL in Ubuntu|Linux|Windows Subsystem for Linux from Scratch
Lets purge everything before starting (in case you installed previously)
1
| sudo apt-get remove --purge *mysql*sudo rm -rf /etc/mysql /var/lib/mysqlsudo apt-get remove --purge *mariadb*sudo apt-get autoremovesudo apt-get autoclean
|
and again, verified that both MySQL and MariaDB (if installed previously)were removed
1
| dpkg -l | grep mariadbdpkg -l | grep mysql
|
Now to fix all broken repositories
1
| sudo apt-get install -f
|
Now Upgrading the Repositories
1
| sudo apt updatesudo apt upgrade
|
Now, to install MySQL 5.7, simply type:
1
| sudo apt install mysql-server
|
Secure MySQL Installation
Execute the below command on your system to make security changes on your Database server. This will prompt some questions. To do the high security provide all answers to yes
1
| sudo mysql_secure_installation
|
1
| harshit95@harshit95-VirtualBox:~$ sudo mysql_secure_installation
|
1
| Securing the MySQL server deployment.
|
1
| Connecting to MySQL using a blank password.
|
1
| VALIDATE PASSWORD PLUGIN can be used to test passwordsand improve security. It checks the strength of passwordand allows the users to set only those passwords which aresecure enough. Would you like to setup VALIDATE PASSWORD plugin?
|
1
| Press y|Y for Yes, any other key for No: y
|
1
| There are three levels of password validation policy:
|
1
| LOW Length >= 8MEDIUM Length >= 8, numeric, mixed case, and special charactersSTRONG Length >= 8, numeric, mixed case, special characters and dictionary file
|
1
| Please enter 0 = LOW, 1 = MEDIUM and 2 = STRONG: 0Please set the password for root here.
|
1
| Estimated strength of the password: 50Do you wish to continue with the password provided?(Press y|Y for Yes, any other key for No) : yBy default, a MySQL installation has an anonymous user,allowing anyone to log into MySQL without having to havea user account created for them. This is intended only fortesting, and to make the installation go a bit smoother.You should remove them before moving into a productionenvironment.
|
1
| Remove anonymous users? (Press y|Y for Yes, any other key for No) : ySuccess.
|
1
| Normally, root should only be allowed to connect from'localhost'. This ensures that someone cannot guess atthe root password from the network.
|
1
| Disallow root login remotely? (Press y|Y for Yes, any other key for No) : n
|
1
| ... skipping.By default, MySQL comes with a database named 'test' thatanyone can access. This is also intended only for testing,and should be removed before moving into a productionenvironment.
|
1
| Remove test database and access to it? (Press y|Y for Yes, any other key for No) : n
|
1
| ... skipping.Reloading the privilege tables will ensure that all changesmade so far will take effect immediately.
|
1
| Reload privilege tables now? (Press y|Y for Yes, any other key for No) : ySuccess.
|
1
| All done!harshit95@harshit95-VirtualBox:~$
|
Connect to MySQL
The MySQL server has been installed on your system. Now connect to the MySQL database using the command line. Use root account password set in above step
Now if you try to connect to Mysql using the root user (command give below)you will end up with message Access Denied root@localhost
First, start the MySQL shell by running the following command as sudo:
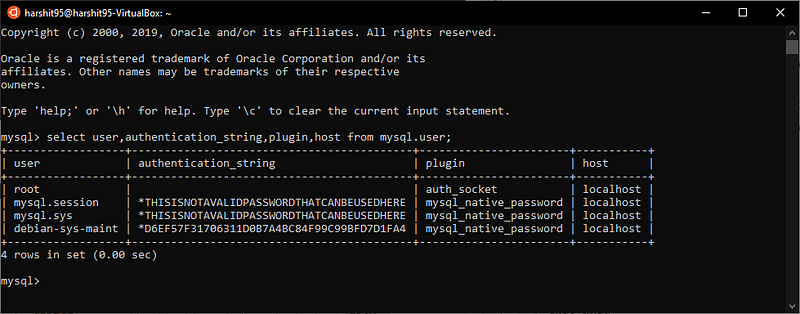
In the MySQL prompt, enter the following command that lets you check the authentication method/plugin that all your MySQL accounts are currently using:
1
| mysql> SELECT user,authentication_string,plugin,host FROM mysql.user;
|
In the above output, you can see that root is using the auth-socket plugin for authentication by default.
Now you have 2 options either
Option 1:Change the authentication method for root
Our purpose here is that the root user should authenticate with a password on MySQL.
1
| mysql> ALTER USER 'root'@'localhost' IDENTIFIED WITH mysql_native_password BY 'password';
|
From now on your root will not have the password you specified while running the included security script, but this strong password you specified in the above-mentioned command.
Reloading the grant tables
Now is the time to tell the server to use the new privilege settings from now on. Run the following command in the MySQL prompt to reload the grant tables and register your changes:
1
| mysql> FLUSH PRIVILEGES;
|
Recheck authentication method for MySQL Users
1
| mysql> SELECT user,authentication_string,plugin,host FROM mysql.user;
|
Now that your root user is setup to connect to the MySQL shell through a secure password.
Check the status of mysql.service
1
| $ systemctl status mysql.service
|
By connecting to MySQL Admin as root and running any administrative command
MySQL Admin is a client that lets you perform administrative operations on MySQL. Let us run one of the administrative commands through it as an example to check if the system is running properly and our root is configured to use it.
1
| $ sudo mysqladmin -p -u root version
|
Option 2: Creating a New User
First, start the MySQL shell by running the following command as sudo:
Let’s start by making a new user within the MySQL shell:
1
| mysql >CREATE USER 'newuser'@'localhost' IDENTIFIED BY 'password';
|
At this point newuser has no permissions to do anything with the databases. In fact, even if newuser tries to login (with the password, password), they will not be able to reach the MySQL shell.
Therefore, the first thing to do is to provide the user with access to the information they will need.
1
| mysql> GRANT ALL PRIVILEGES ON * . * TO 'newuser'@'localhost';
|
Once you have finalized the permissions that you want to set up for your new users, always be sure to reload all the privileges
1
| mysql > FLUSH PRIVILEGES;
|
Now connecting using the command
Reference Articles :
Reference